I have been working for a while now on a Raspberry Pi based DSLR control system. This post is about my efforts to miniaturise it so that I can easily mount it to the hot shoe of my DSLR camera.

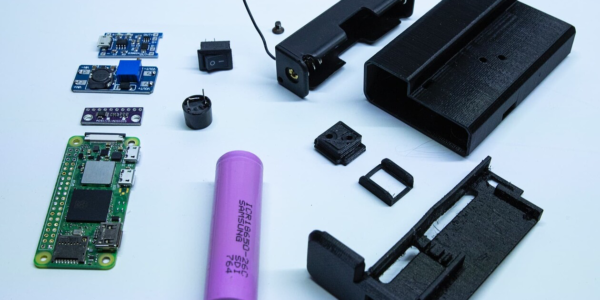
As you can see from the above shot, I’ve 3D printed a case that is the absolute smallest that I can make it, considering that all the included items from the below shot are crammed in there.

I have the following:
- Pi Zero W
- 18650 Battery
- 18650 holder
- LiPo charge / discharge board
- Boost board
- ADC to measure voltage
- Piezo speaker
- Power switch
Assembled looks like this:


Basically the LiPo charge board gets its voltage input direct from the 18650 battery, then the charge board output goes to the boost board, boost board output to the Raspberry Pi GPIO pin 4 and 6.
The 18650 and boost board deliver a regulated 5v to the Pi Zero and can power the Pi Zero for almost 6 hours.
When the battery goes under 3.2v the charge board will stop outputting to the boost board and the Pi will be shut down.
By plugging in a micro USB to the charge board, the 18650 will be charged.
You can power the Pi and charge the battery at the same time as well.
I also have the ADC board connected to the SDA and SCL pins on the GPIO, and the analogue input comes from the battery. This allows for reading the battery voltage to display so that I know what the battery percentage is sitting at.
Usage:
This system is used to control a DSLR camera via a web browser, be it laptop, tablet or phone, connected to the Pi Zero via a wifi hotspot on the Pi.
Functions available include:
- Logging camera and functions to db
- Set any camera function or value from the web browser
- Take a preview photo from the web browser and see the image on phone/tablet etc
- Time-Lapse recording including preview of images and movie
- Automated exposure to account for ‘holy grail’ day to night or night to day time-lapses
- Using my other project that is a custom PCB HAT for the Pi, control 3 axis of motors for movement control.
Software
The software solution is based on Raspbian and relies heavily on the Gphoto2 library for all the camera control functions.
When a new camera is connected via USB to the Pi Zero and a User opens the browser page ‘Camera’, all the details of the camera are queried and logged to the database, including the camera type, name, manufacturer and serial number.

In the screen shot above you can see that I set the storage location to Memory Card and set a preview and runtime image quality, this is what the file type will be saved to the camera memory card.
ISO, Exposure time and Aperture can be set and used when the User hits the ‘Preview’ button.
Once the camera takes the image and transfers it to the Pi Zero, the preview is displayed.
The User can also run a quick sequence time-lapse from this Camera screen as well, setting the number of shots and interval between shots.

When a sequence is running, the ‘Main’ screen shows the progress.
Current ISO and Exposure speed are displayed as well as camera free space on the card, and the Pi, Camera battery level and the status of the time-lapse.
A preview of the last taken shot as well as the basic histogram information regarding calculated BINS.
The system included the ability for it to manage the exposure automatically, using some secret sauce, but there’s a method to look at the histogram data and determine if the image is too light or too dark.
If it is not correct then the system increases or decreases the exposure by 1/3 stop.
If the image is too dark, then the exposure is increased rather than the ISO.
If the Image is too light and the exposure is at the recorded max, then the ISO will be decreased.
This allows for the maintaining of lowest possible noise levels in the shot.
That got way more complicated that I intended for a hardware post, but ask me any questions if anyone is interested.